Understanding the date filtering for Hubspot tables

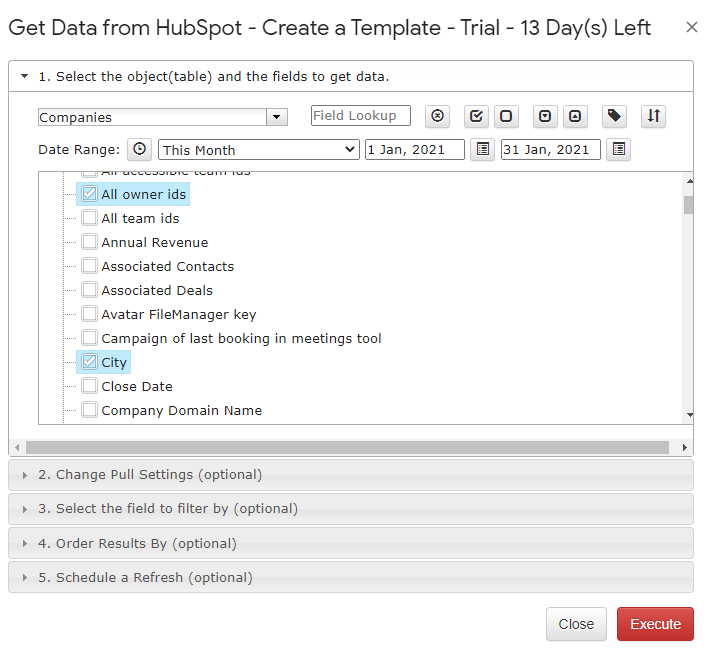
There are two independent ways to perform date filtering while pulling Hubspot tables:

  • Primary filtering by “Created Date” in the “1. Select the object(table) and the fields to get data.” (“Date Range” or “Dynamic Date Range”)
  • Date filtering in the “3. Select the field to filter by (optional)” tab

It’s necessary to understand that the primary filtering is always executed before any additional filters. So, if you will select the primary filter as “This Month”

and then you will select the “Create Date” filter “This Year” with the “Match any of the following” option:

The effective filter will be “This Month” because the “Match any of the following” option never applied to the primary filter.

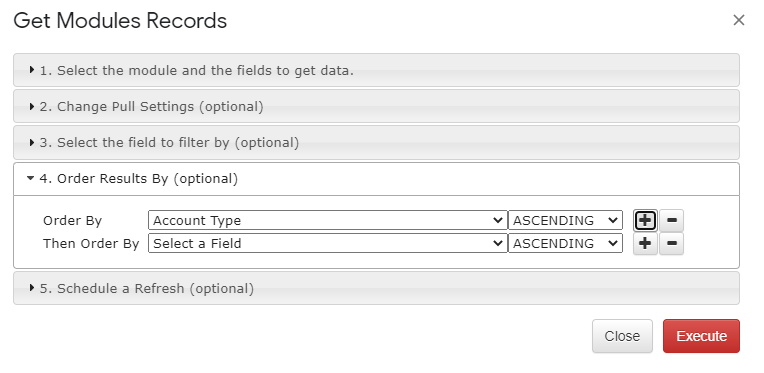
The primary date filter

“Date Range” vs “Dynamic Date Range”

In the primary filter, you can choose between static and dynamic date ranges. The difference is that as soon you’ve selected the static date range, the selected values will be saved and used for all future queries. So, if I will select the date range “This Month”, I will the filter will be set for the ‘Create Date” filter between Dec 1st, 2021 and Dec 31st, 2021. If I will execute that the same query a year later, the filter will still be the same.

For the “This Month” dynamic date range, every new month the date filter will be automatically updated for the current month, so it will be between Dec 1st, 2021 and Dec 31st, 2021, between Jan 1st, 2022, and Jan31st, 2022. and so on…

Dynamic Date Range has two additional values: “Trailing Days” and “Trailing Month”. After selecting one of these ranges, I will have to select the value for the days or months. So, if I will select “Trailing Days” with the value 30, every time I will execute the query the date range will be set between today and 30 days before.

To switch between the “Date Range” and “Dynamic Date Range”, please click on the corresponding button:

To “Dynamic Date Range”:

Back to “Date Range”:

The regular date filters

In contrary to the primary date filters, the regular date filters can be executed against any Hubspot date field, eighter system, or user-defined. The options list for the regular date filter includes both static and dynamic ranges: if there is a date to filter against, the filter is static. If there is no date value (for example, “This Month”, “This Year”, “Trailing Days”), the filter is dynamic.

Static filter:

Dynamic filter:

HubSpot tutorial : Create new sheet/Append to current sheet when pulling data

Option 1: Permeant Settings

This will apply to ALL future pulls

1. Select Add-ons -> G-Integrator for Hubspot -> Tools -> User Preferences

2. Under the “Default Data Pulling Settings, toggle “Create a new sheet” option

Option 2: One-time setting

This will apply ONLY to the current pull

1. Select Add-ons -> G-Integrator for Hubspot -> Get HubSpot Data

2. Under tab 2: “Change Pull Settings (optional)” toggle “Create a new sheet”

HubSpot Tutorial: Get Module Records

1. Go to “Add-ons” tab in the toolbar, select “G-Integrator for HubSpot” from dropdown list, select “Get Module Records” from second dropdown list.

2. From the dropdown list select the desired module

3. Select desired date range and fields

4. Click “Execute”

Tutorial: Get Output on New Sheet vs Replace Data in Same Sheet vs Append to Existing Data

Changes the way new data appears relative to existing data.

NOTE: The default setting is for the data to appear on a new sheet. Sheets can be switched between at the bottom of the window

TO REPLACE DATA ON CURRENT SHEET:

1. Follow standard process to get module records (See tutorial for step by step instructions). DO NOT PRESS EXECUTE

THE FOLLOWING STEPS MUST BE TAKEN BEFORE PRESSING EXECUTE

2. After selecting desired fields, Select option 2 “Change pull settings (optional)”

3. De-select option “Create a new sheet”

TO APPEND DATA TO CURRENT SHEET:

1. Follow standard process to get module records (See tutorial for step by step instructions). DO NOT PRESS EXECUTE

THE FOLLOWING STEPS MUST BE TAKEN BEFORE PRESSING EXECUTE

2. After selecting desired fields, Select option 2 “Change pull settings (optional)”

3. Change value in the “Start Cell Address” field to an unoccupied column

Tutorial: Sort Output by Field(s)

This process sorts the data by (a) specified field(s)


1. Follow standard process to get module records (See tutorial for step by step instructions). DO NOT PRESS EXECUTE

THE FOLLOWING STEPS MUST BE TAKEN BEFORE PRESSING EXECUTE

2. After selecting desired fields, Select option 4 “Order Results by (optional)”

3. Select field to sort by and whether to sort in ascending or descending order

4. If you wish to further sort by another field (after the first level of sorting) press the “+” (plus) and repeat step 3. To remove a field press the “” (minus)

Sample result (sorted by Account Type and Billing City):