New filtering module

Dear clients! We are very excited to share with you our latest improvement in the HubSpot add-on: a new filtering subsystem!

The new filtering module is not fully compatible with the legacy one, so some of your queries would not work with it. To resolve this we will keep both filtering modules, and you can switch between them at any moment.

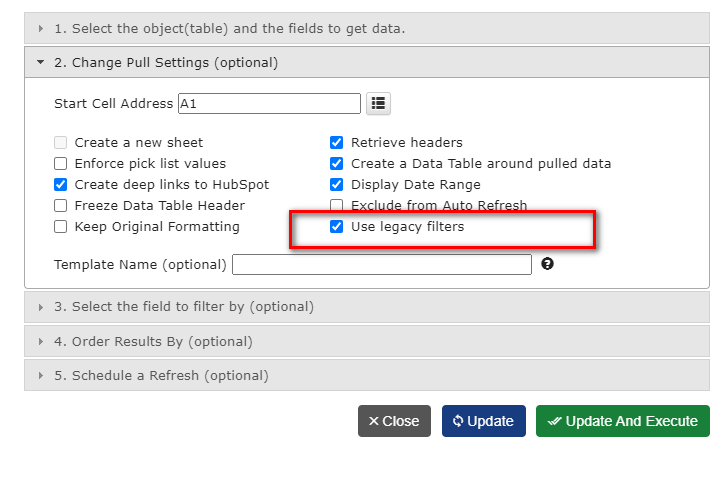
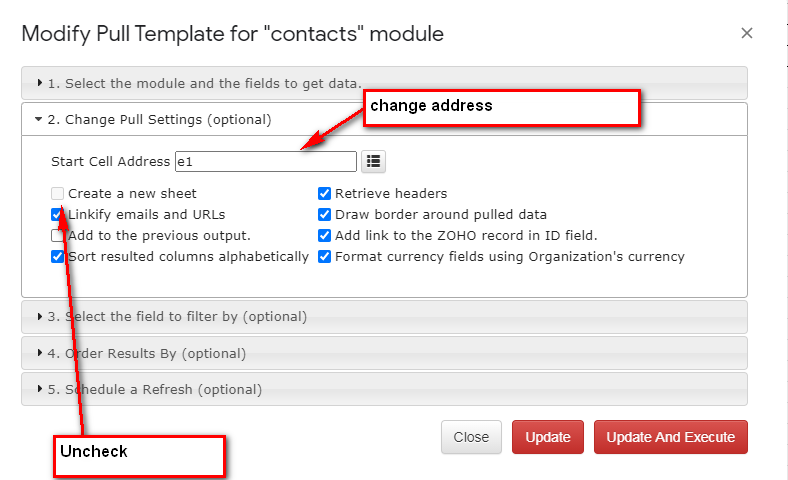
Currently, the legacy filtering subsystem is used by default – we will change this in a few weeks. To switch between old and new filtering modules, check/uncheck the option “Use legacy filters” in the “Change Pull Settings” tab. If you do not see the “Use legacy filters” flag, try to refresh the web page.

There are some key differences between old and new filtering:

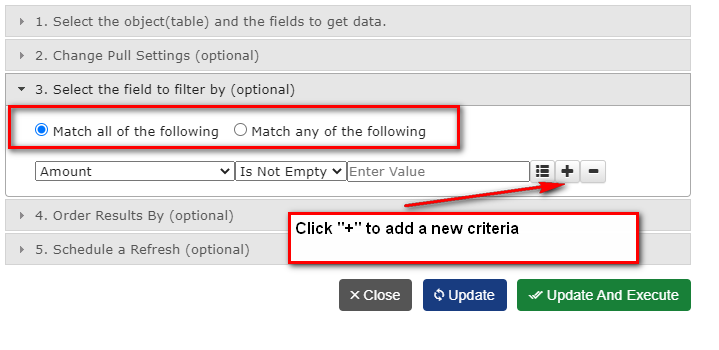
  • In the new filtering, we made one global option to connect the filtering criteria: ” Match all of the following” or “Match any of the following”.
    If the table has a mandatory date filter in the 1st tab, it will be applied before any other filter using the logical ‘AND’ condition!
  • You do not have to click on the “+” button to apply the filter -it will be applied immediately as you configured it. The “+” and “-” buttons are used to add or remove the filtering criteria.
  • You will find many new filtering criteria, especially for dates.
  • Last, but not least: we have enabled many new fields to be used for the filtering. There may be some reasons why the previous owners restricted so many fields from the filtering, so it’s possible that some of the new fields would be a problem. Please notify us about any of it and we will investigate it ASAP.

We hope you will find the new filtering module more powerful and easy to use than the legacy one. We use that the same module for almost 2 years in our two other add-ons: G-Integrator for Zoho CRM and G-Integrator for Zoho Books and the clients found it helpful.

If you have any concerns or suggestions, please leave a comment here or email us: support@g-integrator.com

Cloud Templates

Dear clients, we are very excited to share with you our new cool feature: Cloud Templates!

Starting now, you can save your query, report, or upload template to our secured cloud storage. This way, you can use this template in any new spreadsheet or share it with your colleagues (assuming they are our clients also). This functionality is available only for our clients with the “Premium” subscription.

We hope you will find many reasons to use this new feature. Here are some examples:

  • Backup: by saving the template to the cloud, you can have a copy of your template in case you will need to roll back the recent changes
  • Migration: you can save the template and use it in another spreadsheet
  • Sharing: you can share the template with any other G-Integrator client
  • Copy/paste: You can save the template and open it in the same document as a new one

Working with the templates

Please see the short video or read detailed description below.

Saving to the cloud.

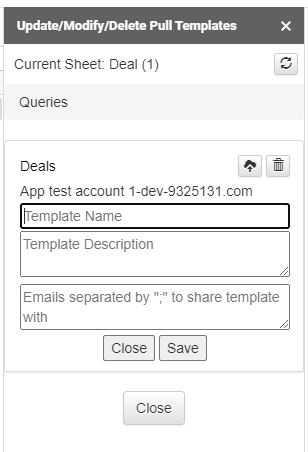
You first have to select the “Update/Modify/Delete Templates for Current Sheet” menu to upload the template. You will see the new “cloud” icon to the right of the template name. After clicking it, you will get the following form:

Please enter the template name and description, and an optional semicolon-separated list of emails to share with.

After clicking “Save” button, your template will be uploaded to the cloud.

Managing templates in the cloud.

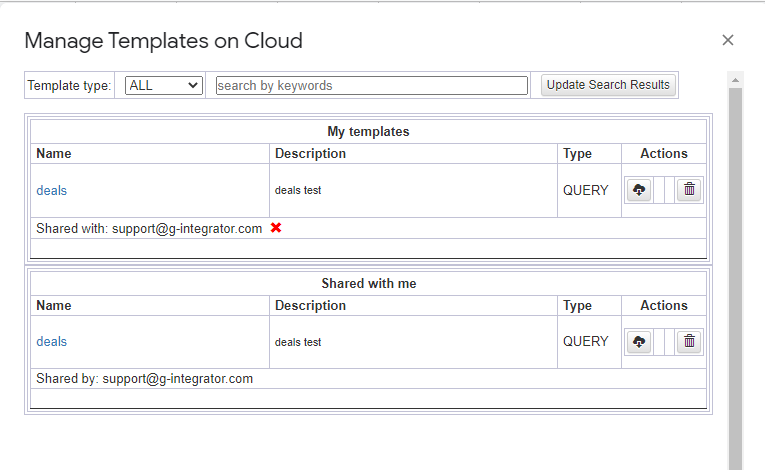
After saving the template, you can use it by clicking the “Manage Templates on Cloud” menu (if you do not see it, just refresh the page in your browser).

You will see the following options:

There are two sections: “My templates”, which shows the templates that you have created, and “Shared with me”, which shows templates shared with you.

With your templates, you can do the following:

  • Open the template – by clicking its name or the “cloud” icon in the “Actions” column. After opening, you can work with the template in the usual way.
  • Delete the template. Shared copies of the template will also be deleted.
  • Revoke the share by clicking on the red cross right to the email.

For shared templates, you can:

  • Open it just like you would open your own template.
  • Remove the share: the original template will not be changed.

We hope you will find this feature helpful. We will be happy to get your feedback and suggestions: here or by email: support@g-integrator.com

.

New feature – custom reports.

Dear friends!

You probably are aware of the excellent product named Zoho Analytics. In my experience, it’s the best way to get your Zoho CRM reports. And we, in the G-Integrator for CRM, have some limited support of it.

But we understand that not everybody has this product, so we’ve decided to create a more restricted, but still useful service we’ve called “Custom reports”.

Currently, there are only four reports:

  • Existing vs New Customers Sales Monthly
  • Existing vs New Customers Sales Yearly
  • Monthly Sales Report
  • Closed Revenue Report

Please see the short video how to use them:

We are working on adding more custom reports in the coming weeks. If you want to have some particular report in our custom reports list, please contact us and we will consider it.

Multiple organizations in Zoho Books

Dear friends!

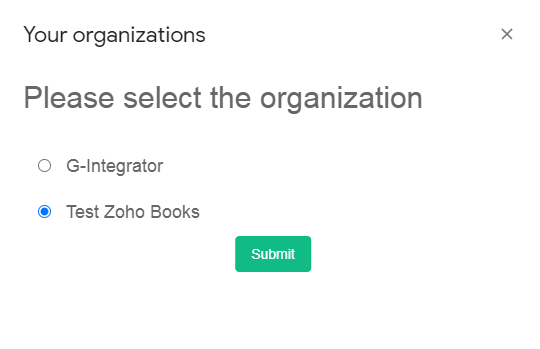
Today we have improved our Zoho Books add-on. Now, if you account have multiple organizations, you will be able to choose which one to use. The previous behavior was to automatically select the default one.

You will be offered the option to choose right after the login to your Zoho Books account. If you already logged in and want to change your organization, you will have to log out / log in (for the first time only).

If you want to switch, click the “Switch Organization” menu option any time.

Using dynamic filters to integrate Zoho CRM and Zoho Books (or any other product)

Dear friends! We are very proud to start our blog with a fascinating and useful feature.

In this post, I will demonstrate how you can integrate your Zoho CRM with another system, using our G-Integrator for Zoho CRM. In this example, I will integrate it with Zoho Books, because we have our G-Integrator for Zoho Books add-on, but it can be anything as long you can write data into the Google Spreadsheet – there are many add-ons on Google marketplace for different systems.

The scenario

We want to show Zoho Books Invoices for all the contacts from the Zoho CRM Deals.

How to synchronize.

  • First, we will link contacts from Zoho CRM and Zoho Books by the “Email” field.
  • Then, we will link Zoho Books Invoices and Zoho Books Contacts by the “Customer ID” field.

What you need for this.

Steps

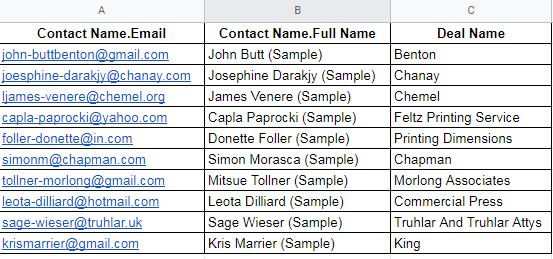
  1. Using the “Zoho CRM” add-on, download the “Deals” module, selecting the following fields:
  • “Contact Name.Email”
  • “Contact Name.Full Name”
  • Deal Name

For the synchronization, we will need only “Contact Name.Email”, other fields are just for convenience.

2. Using the “Zoho Books” add-on, select the “Contacts” module, selecting the following fields (again, we really need only “Contact Id”):

  • Contact Id
  • Contact Name
  • Email

For the convenience, we will update Pull settings to keep it on the same tab

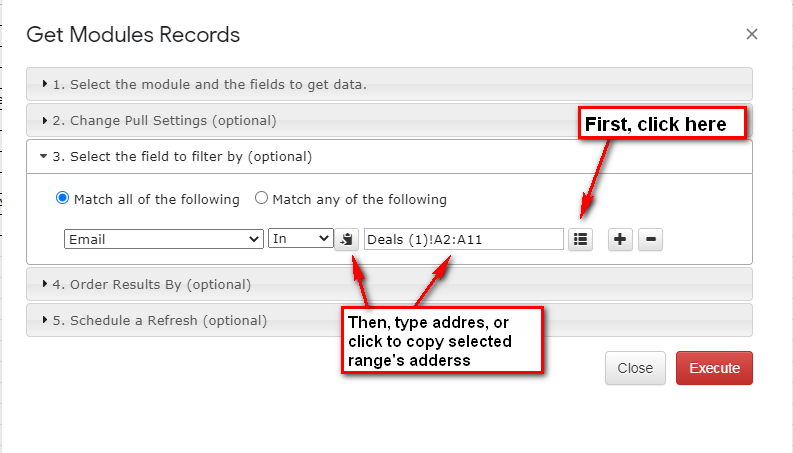
And we will use “Dynamic filters” to select only the records where email is in our Deals emails:

2. Using the “Zoho Books” add-on, select the “Invoices” module, selecting the following fields:

  • Customer Name
  • Date
  • Invoice Id
  • Invoice Number
  • Total

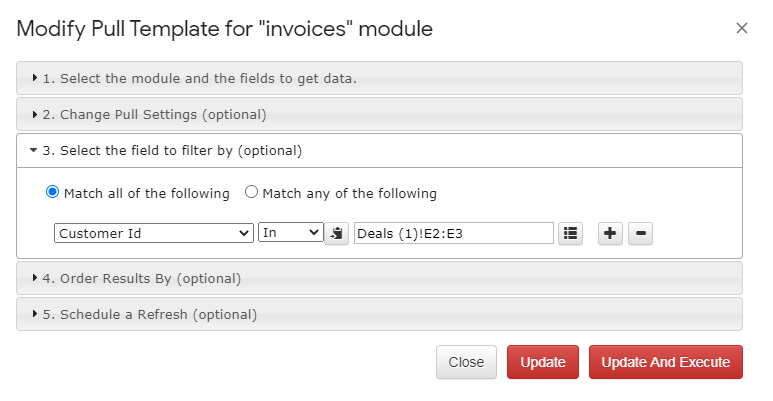
And again, we will use dynamic filter to link the “Customer ID (which we do not show) with the “Contact ID” from Contacts

And this is all! Click on the image below to see it full size.

And, if the records from “Deals” will be updated, we just need to refresh Zoho Books queries to update Invoices. Enjoy!

Conclusions

Of course, there are many other ways to use the dynamic filter – you can integrate Zoho CRM not only to Zoho Books but to any other accounting system, like Xero or QBO, using any of the available in the Google Marketplace add-ons. Or you can add data for the integration manually, by copy/paste.

Also, you can integrate modules inside Zoho CRM or Zoho Books – please see the short demo video of the linking Contacts module to the Deals module by Contact.ID in G-Integrator for Zoho CRM:

This is our new functionality and there is a lot to improve. Please help us by sending your requests and bug reports – you will be heard!

How it all started (this is the old post I’ve copied from another blog)

You can download G-Integrator for KML Android app from Google Play Store.

The idea to create this application came to me, while I stood near the Tokyo Skytree Station, looking for the location of my Airbnb rental.

We just arrived to the Japan. Behind our backs was 15 hours flight, then waiting in line to pick up our pre-ordered railway passes, and almost 2-hours trip (with 2 connections) from the airport.

And now there was a final segment: 10 min. walk to the rented apartment.  And I’ve already spent 30 min., trying to figure out how to get there.

I was well-prepared to navigate in Tokyo: I had Google Map,  and, in case I will not be able to connect to the network, I had offline map. Two of them actually.

The problem was, that I had saved location of the apartment in the Google map, and, by some reason,  my US phone was not able to pickup the cellular network in Tokyo (later I’ve figured it out). And Google map did not allow to pre-load data for offline use in Tokyo, so, currently, it was useless.

I also had location saved to one of my two offline apps, but this particular app has been recently updated and there was a bug, so I was not able to start it up.

I also had the address of the apartment, printed on paper in plain Japanese. And, of course, I was not able to use it to navigate – I know a few dozen of Japanese words, but cannot type it.

So, finally, I’ve given up and rented a cab, and in a few minutes we were at the apartment.

P1070949

The Tokyo SkyTree Tower, as we have seen it for the first time.

Two weeks in Japan were fantastic, and, after returning home, I’ve started work on my first Android app (but not my first app at all – of course: I have 25+ years experience of the software development).

The idea is very simple:

  • You save all your waypoints in the KML or KMZ file. These are formats for Google Earth and Google Maps.
  • You copy this file to the phone and load it into G-Integrator.
  • You can see loaded waypoints on the map on your device (and, if you are offline, you can use the cached map, so you still will be able to see it).
  • You can click on the waypoint, see its description and picture (if available), and send the location if this waypoint to any map/navigation application installed on your device, online or offline – Google Maps, Waze, Sygic, etc.

Today, in August 2017, after about 1 year of development, 68 releases and almost 2500 installations by the customers from over the world (I love you, guys – you make me feeling connected), it can much more – see help page for details. I use this app in all my trips, and after each trip I add some improvement. So stay tuned – it will be fun!